Showing posts with label Apple. Show all posts

Thursday, September 17, 2015

Play DVD ISO through Apple TV 4 on HD TV

The latest version of New Apple TV- the fourth generation, supports H.264 video in up to 1080p, 60 frames per second. The device also plays content from any Mac OS X, iOS device or Windows with AirPly or iTunes. The 4th generation also uses a new TvOS operating system, with an associated app store allowing download of third-party apps for video, audio, games, and other content. Do you have a lot of DVD ISO image files at hand? Ever thought of playing DVD ISO files through Apple TV 4 on HD TV with a wonderful experience with better visual enjoyment?


Working as a swiss army knife in DVD ripping field, iFastime Video Converter Ultimate for Mac removes the copy protection from your DVD and convert to Apple TV 4 friendly formats. Besides, it not only can work in DVD ISO, Blu-ray folder, Blu-ray ISO but also can convert Blu-ray and unsupported video to Apple TV 4 with high resolution, and then you can put them to on HD TV, or Smart TV, 3D TV, 4K TV, and more(Samsung TV, LG TV, Sony TV, Panasonic TV included). What’s more, this powerful app supports Mac OS X 10.11 El Capitan, Mac OS X 10.10 Yosemite, 10.9 Mavericks, 10.8 Mountain Lion, 10.7 Lion, 10.6 Snow Leopard, 10.5 Leopard. If you're using a Windows PC, please turn to iFastime Video Converter Ultimate, which has the same function as the Mac version. (read review).

Hot search: 
Blu-ray movies to Apple TV 4 |  How to stream AVI to Apple TV 4 |  4K H.265 to Apple TV 4  |  MP4 to Apple TV 3 

Free download the top Tivo Converter for Mac:


Other Download:

Rip DVD ISO to Apple TV 4 Suitable Format on Mac

Step 1. Load DVD ISO files

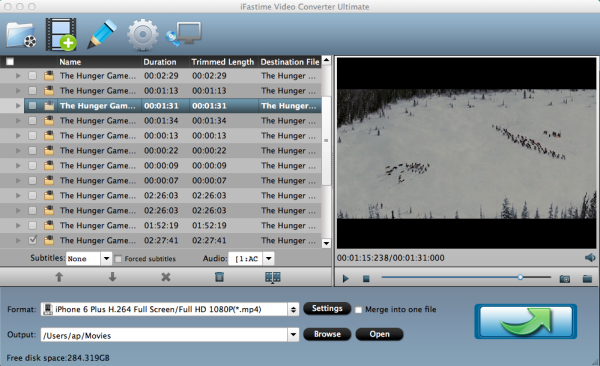
Run the program and click “Load file(s) > Load IFO/ISO” to add the ISO files. As you can see, you can also load DVD Folders and IFO files to rip.


Step 2. Choose output format and folder

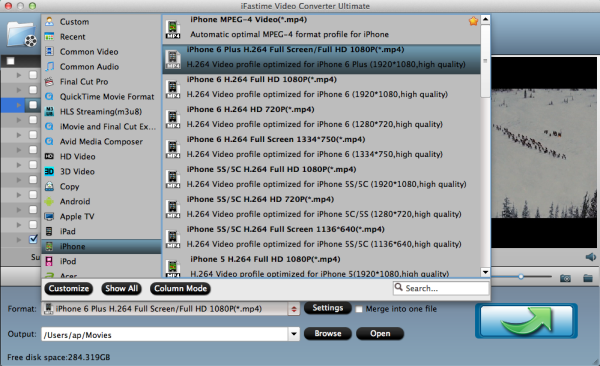
Click on the dropdown menu of "Format" and then choose the format from the "Apple TV" sublist, which are all compatible for the Apple TV 3/4. 


Tip:

1. When you choose "Apple TV 3 Dolby Digital Pass-through (*.m4v)" as output, an AC-3 encoded audio track will also be included for Apple TV 4 to Pass-through Dolby Digital 5.1 sound (also know as AC3 5.1), so that it will work in surround sound when Apple TV 4 is connected to audio receiver, and in stereo when Apple TV 4 is connected with TV only. And note only when your movie has 5.1 channel, you will get the real 5.1 surround sound effect.

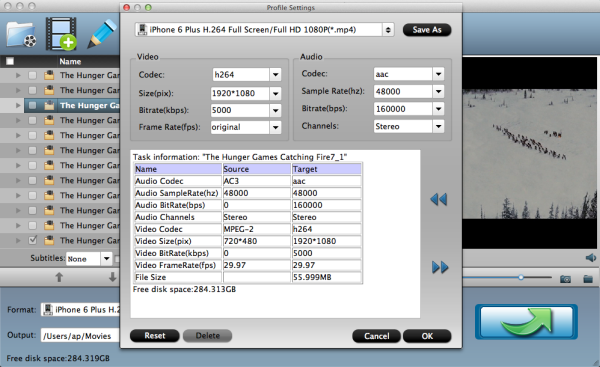
2.Generally, if you choose the optimized format for Apple TV 4 from the "Apple TV" file, you don't need to change the video and audio parameters again. But if you have special demand, you can click the "Settings" icon and go into a new interface named "Profile Settings". You can adjust codec, aspect ratio, bit rate, frame rate, sample rate and audio channel here.

Step 3. Rip DVD ISO to Apple TV 4 on Mac

Start the DVD ISO to Apple TV 4 conversion on Mac by clicking on the "Start conversion" button at the bottom right corner. After the short conversion, you will be able to get the output files for Apple TV 4 via clicking on "Open" button effortlessly.

Now you can sync DVD ISO on the new Apple TV 4 for enjoying with high quality. You should know, for streaming media from a Mac, iTunes must be 10.6 or later. And to get 5.1 sorround sound, AV Reciever is necessary.

Stream ripped DVD ISO on Apple TV 4 via AirPlay or iTunes:

Via AirPlay:

Firstly, to use AirPlay, you need to prepare one of the following devices: iPhone 4 (or later), iPad, iPad mini, or iPod touch (4th generation or later). Add the ripped DVD ISO movies to iTunes and sync to your iOS device.

Secondly, be sure iOS device and Apple TV are in the same Wi-Fi network; start play the video on your device, and then swipe up from the bottom of your device screen to access Control Center and tap AirPlay; 

Thirdly, tap the name of the device you want to AirPlay to.

Via iTunes:

Firstly, add the ripped DVD ISO videos to iTunes. Then, go to iTunes > Preferences, choose Apple TV, and make sure "Look for Apple TVs" is selected.

Secondly, on your Apple TV, choose Settings > Computers > "Connect to iTunes," and note the passcode displayed; in iTunes, select the Apple TV (below Devices), and enter the passcode.

Thirdly, click the Summary button and select one of "Automatic Sync" and "Custom Sync".

After all the operation, you should be able to Play DVD ISO through Apple TV 4 on HD/Smart/3D/4K/ TV freely. Just enjoy now!

Have more questions about how to play DVD ISO through Apple TV 4,  please feel free to contact us>> or leave a message at Facebook.

More Topics:


Monday, August 24, 2015

How to Put DVD ISO/IFO to VR One via iPhone 6 for watching?

According to market research, ZEISS VR One is one device allowing us to make it the perfect companion for videos, games and augmented reality in the world of virtual reality. With it, you will get the premium experience you expect. The VR One delivers that experience unlike any other mobile VR goggle available, the smartphone you carry in your pocket can take you to worlds of virtual and augmented reality. Luckily, from the website, currently it supports iPhone 6, Samsung Galaxy S4, and more smartphones. It is an exciting thing to DVD ISO/IFO to VR One via iPhone 6 for watching.

Maybe you have backuped many DVD videos to ISO image files or IFO folders, and want to watch them in your iPhone 6 anytime anywhere. But VR One Cinema app by default only  supports playing ".mov", ".m4v" and ".mp4" file formats and side-by-side videos. Take it easy, just keep reading, we will teach you the method.

What you need to do is transcode DVD ISO/IFO to VR One playable format as 3D MP4, 3D MKV. As a top-quality professional converter, iFastime Video Converter Ultimate (Review) is luckily intruduced to you. With the help of it, you can easily convert DVD ISO/IFO imge files to VR One supported format like 3D MP4, 3D MKV for watching. Besides, it also supports 6X fast conversion speed and zero quality.
Free Download or Purchase iFastime Video Converter Ultimate:


Other Download:

How to Rip DVD ISO/IFO files to VR One via iPhone 6 for watching?

Step 1. Add DVD ISO/IFO file

Launch the program. Click on "IFO/ISO" icon to load your DVD ISO/IFO file into this program.
After the files are loaded, you can preview them on the right viewing window and take snapshots of your favorite movie scene if you want. 


Step 2. Select output format

You can click the "Format" bar and choose one from "Common Video" list. If you want to play 3D movie with VR One, you can choose "MP4 Side-by-Side 3D Video (*.mp4)" or "MOV Side-by-Side 3D Video (*.mov)" from "3D Video" profile list.


Step 3. Advanced Video/Audio settings 

Click "Settings" button to do corresponding settings regarding to video, audio. Note that VR One compatible audio has to be encoded in AAC or MP3. 


Step 4. Start converting 

After you have done all the settings, return to the main interface to hit the green arrow button to start DVD ISO/IFO to VR One converting process. When the conversion is finished, click Open button to get the output DVD videos. 

Step 5. Add and view the movie on VR One via iPhone 6

The ZEISS VR One Cinema app enables you to enjoy your movies in an immersive environment with the lights off. Download it on the Apple App Store/Google Play and run it.

How to Transfer your movies to your iPhone 6?

1. Connect your iPhone 6 to iTunes
2. Select your iPhone and go to "Apps" / "File Sharing" / "VR ONE Cinema"
3. Drag and drop any .mp4 / .mov file into the list of documents.
4. Important: DRM-protected movies (e.g. purchased movies from iTunes Store) are not supported.
5. Hint: For 3D side-by-side (SBS) movies, please make sure that the filename contains "SBS".
6. Movies in 720p resolution are best for watching in the VR ONE Cinema.
7. Download detailed Instructions for iOS

Now go to watch your converted 3D videos tin VR One via iPhone 6 heartily.

Have more questions about how to put DVD ISO/IFO to VR One via iPhone 6 for watching, please feel free to  contact us>>

More Topics::

Wednesday, August 19, 2015

The easiest way to import AVI to iMovie for editing

iMovie is a video editing software application sold by Apple Inc for the Mac and iOS (iPhone, iPad, iPad Mini and iPod Touch). It lets you organize all your clips, turn them into your favorite videos, films or trailers. If you have recorded some AVI videos by your camera, maybe you want to edit them in iMovie to use many purposes, but always have some troubles with importing AVI to iMovie, such as “nothing showes up on screen” or get "grey out" in the import window, and only audio but no picture.”, etc.


Why can’t import AVI to iMovie?

Firstly you should know what formats iMovie supports. According to Apple, iMovie supports most commonly-used video codecs, including DV, MPEG-2, MPEG-4, H.264, AVCHD and AIC. AVI compresses the video with non-conformant compression standard and different video codecs (DivX, Xvid etc) are not compatible with iMovie. So when you can’t import AVI to iMovie, maybe because AVI codecs are not recognized by iMovie.

How to import AVI to iMovie with the easiest way?

To add and edit AVI files in iMovie (iMovie 11/iMovie 9/iMovie 8), you need to convert AVI to iMovie friendly format like AIC MOV. iFastime Video Converter Ultimate for Mac (Review) is one of the effective options for converting AVI files to a format that is well compatible with iMovie. It offers an optimized preset Apple Intermediate Codec .mov for iMovie for easy access. Besides converting AVI video to iMovie supported videos with optimized settings, the all-in-one and easy-to-use toolkit can convert any video like H.265, AVI, MP4, MKV, FLV, WMV, MPG, Tivo, MXF, XAVC, MOV to popular editing software like FCP X, FCP 6/7, FCE, Premiere Pro, Resolve, After Effects, etc. on Mac OS X 10.11 El Capitan, Mac OS X 10.10 Yosemite, 10.9 Mavericks, 10.8 Mountain Lion, 10.7 Lion, 10.6 Snow Leopard, 10.5 Leopard.with ultrafast converting speed and untouched high quality.


Other Download:

How to Transcode AVI for importing to iMovie for editing on Mac

Step 1. Add AVI files to this program

Go to select “Load Files”option to import the AVI files. Or you can directly add AVI videos to the program with drag and drop method.

Mac MP4 to Premiere Pro Converter

Step 2. Select iMovie output format

Click “Format” bar to choose the output format. Click and choose iMovie and Final Cut Express>Apple Intermediate Codec(AIC) (*.mov).


Tips: click “settings” button to adjust the output video’s parameters, such as bitrate, size, frame rate,etc.


Step 3.Start converting AVI to AIC MOV for iMovie editing on Mac

Click the green arrow convert button to start converting AVI to AIC MOV videos to be compatible with iMovie.

After the conversion finished, you can easily import video files and projects into iMovie for further editing without any trouble. Follow the simple steps to add the converted video files on iMovie.

How to add converted AVI files on iMovie?

1. Open your iMovie program.

2. Set your camera to the correct mode for video export. This mode setting will typically say "PC" or "Computer."

3. Plug your video recording device into your computer using the designated USB or Firewire cord for your specific device.

4. Select the "Video Import" button designated by a video camera icon located directly above the "Event Library" menu.

5. Import your video footage into the iMovie project you are editing in.

6. Decide where you want your video clips to be stored within the iMovie program.

7. Click on the "Import" button to commence importing the video footage you have selected.

With this AVI to AIC Converter, you can easily change AVI files to iMovie for editing.Just have a try!

Have more questions about how to import AVI to iMovie for editing, please feel free to contact us>>

More topics:

Tuesday, August 18, 2015

How to Import AVI to FCP X/7 for editing on Mac?

Final Cut Pro is a professional editing software developed by Macromedia Inc and Apple Inc. It is a wonderful tool to help you put your videos such as AVI videos into professional eye-catching movies.
However, not all AVI files can be accepted by FCP X/7. 


That is to say, if your AVI video files are not imported, that's maybe because the AVI file codec is not recognized by Final Cut Pro. Therefore, sometimes you may find it a painful experience to import AVI files into Final Cut Pro X/7 for further editing, and you may encounter some problems as below: 
“I'm trying to import a number of small .avi files into FCP X but each time I try I get the message "No importable files - None of the selected files or folders can be imported. Change the selection and try again.”
“Though I successfully import Blackmagic Cinema Camera recorded AVI footage to Final Cut Pro 7, it only gets audio in its full length, but video is all blank.”
Faced with those situations, you’d better change AVI to FCP X/7 more friendly format like MOV. Don't worry! For most AVI video files, you only need a powerful tool like iFastime Video Converter Ultimate for Mac to make AVI(DivX, Xvid, H.264 etc. codecs) file compatible with Final Cut Pro X/7, which is fully compatible with all major Mac OS X operating systems like Mac OS X 10.11 El Capitan, Mac OS X 10.10 Yosemite, 10.9 Mavericks, 10.8 Mountain Lion, 10.7 Lion, 10.6 Snow Leopard, 10.5 Leopard. The professional converter also helps to convert H.265/XAVC/MTS/MXF/AVI/MP4/FLV/WMV/MPG etc. 

Hot search: H.265 to FCP | Canon EOS M10 MP4 to FCP | Sony A7SII AVCHD in FCP | WMV into FCP | DVD to FCP

Firstly download this top-ranked AVI to FCP converter and run it on your Mac:


Other Download:

Simple three steps to Encode AVI to Final Cut Pro X for editing

Step 1. Import AVI files to the program

Simply drag-and-drop your files or use the files tab in the converter's interface to browse for your .avi files in your computer.


Step 2. Choose FCP X compatible format

Go to "Format" bar and choose "Final Cut Pro > Apple ProRes 422 (*.mov)" as output format for Final Cut Pro X.


Tips: Adjust video and audio settings

Click the "Settings" button and customize proper video/audio parameters including Video size, bitrate and fame rate and more.


Step 3. Start converting AVI to Final Cut Pro

You should be ready to start conversion at this point. Just click on the green arrow button that can be found on the menu. Wait for a while and the video converter will do the trick. You will soon have your AVI video into a format that's recognizable and editable by Final Cut Pro X– the MOV format.

When the conversion is done, you need to import converted videos to FCP X/7. And how to import videos into FCP X/7?

How to Import videos files into Final Cut Pro X/7?

Here are the main three steps:

Step 1. Run FCP X/7

Run FCP X/7 on Mac and connect your camera to Mac with a USB cable and turn it on.

Step 2. Import video files from camera to FCP X/7

Click File on main UI to follow “Import” and “Media”. FCP X/7 allows you to import iMovie project, iMovie Event Library and camera.

Step 3. Create new event or add to the existing event

After checking the video files you want to import in your camera, click return to choose to create new event for this importing or just add the video files to the existing event.

Step 4. Edit video files in FCP X/7 timeline

After clicking the “Import” button in the third step mentioned above, you’ll find the imported video files under “All Clips” item, and right click to follow “Open in Timeline” and you can edit them freely.

Now you can edit your AVI videos in Final Cut Pro X/7/6 at ease.

Have more questions about how to change MKV to FCP X for editing, please feel free to contact us>>

More Topics:

Friday, August 14, 2015

Copy DVDs to iPhone 6S, iPhone 6/6 Plus on Mac

Are you still worrying about that you have no time to watch your DVD when facing an array of DVD discs on your shelf? Now you don't need to watch DVD movie only stay at home, you can copy your favorite DVD movies to iPhone 6S or iPhone 6/6 plus for watching when on the road.


Now that iPhone have rocked into the mainstream, there's an easy way taking DVD movies alongside, i.e., ripping DVD and putting movies onto your iPhone (6/6 Plus/6S). The process is easier than you may think, here I would throw this quick tutorial up on how to copy DVD movies to iPhone (6/6 Plus/6S) via Mac.

To achieve this task, you need the help of a DVD converter. Puzzled at what software to use? Well, here iFastime Video Converter Ultimate for Mac (Review) is highly recommended to help us to rip DVD to iPhone (6/6 Plus/6S) playable videos with optimized video settings since it has specific outputs for almost all the iPhone models. What's more, the program is easy to use for editing and conversion and makes great quality copies of my DVDs. It is able to rip all the Blu-ray Discs even ISO/IFO image files as well as keep desired subtitles and audio track. 

If you're running on Windows PC, please refer to Video Converter Ultimate to get DVD and various videos for all iPhone series on Windows (Windows 10 included). Now please download the program and follow the step-by-step guide below.

Free Download iFastime iPhone Video Converter Ultimate for Mac:


How to Rip and Copy DVD to iPhone 6S or iPhone 6/6 plus on Mac?

Step 1: Add DVD movies

Start the excellent Mac DVD to iPhone Converter and click DVD disc icon to load source DVD movies. If you have backup the entire DVD disc on hard drive, you can also click DVD Folder button to load the movie folder. As you can see, added files can be previewed on the right viewing window and you can take snapshots of the movie scenes you like freely.


Step 2. Choose output format.

The DVD Ripper provides you the preset video format for iPhone 6, iPhone 6 Plus, iPhone 5S, iPhone 5C and more. Just click "Format" bar and select iPhone model you have from "iPhone" category to get videos with optimized settings for playing on your phone. If you want HD videos, you can choose HD formats as the output format.


Step 3. Start the conversion

Click "Start conversion" button (on right bottom of the main interface) to start the conversion from DVD to h.264 mp4 for your iPhone (6/6 Plus/6S) on Mac. When the conversion completes, you can click "Open" to get the ripped files and drag them to your iTunes library and then sync them to your iPhone (6/6 Plus/6S) with ease!

So there you have it. Pretty simple. Now watch DVD movies on iPhone (6/6 Plus/6S) when on the road!

Some helpful features of the Mac DVD to iPhone Converter:

a. Subtitles – Select the subtitle language you like from "Subtitles" options. Meanwhile, you are able to choose your master language of audio track from "Audio" option.

b. Settings – Click "Settings" button to set the video/audio parameters for HTC One X. Remember the file size is based more on bitrate than resolution which means bitrate higher results in big file size, and lower visible quality loss.


Not an iPhone user? iFastime Video Converter Ultimate for Mac can also convert DVD, 2D/3D Blu-ray movies, ISO/IFO as well as video files like H.265/HEVC, XAVC, Tivo, MKV, WebM, M4V, FLV, AVI, Divx, Xvid, VOB, MPG, MXF, MTS, M2T, TS, etc. video files to various video formats for playing on your Android OS/Windows based device, smart TVs, Samsung Gear VR, ZEISS VR One or Media Players, saving on NAS, Dropbox, Plex, Google Drive, OneDrive, iCloud, etc., as well as editing them in FCP X, iMovie, Avid, Premiere, FCE, Affter Effects, etc. on Mac OS X.


Have more questions about how to copy DVD movies to iPhone (6/6 Plus/6S) via Mac, please feel free to contact us>>

More Topics:

Thursday, August 13, 2015

Sync TiVo to iPad (Air 2/Mini 3 included) via Mac

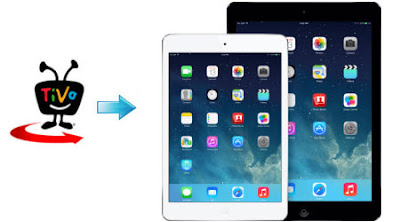
Description: Are you still racking your brains about how to sync Tivo recordings to iPad on Mac? To tell you a good news, you just come to the right place. The article will share the simplest solution to convert and transfer Tivo to iPad via iTunes in a breeze. Let's move on.

Imagine, if you transfer your TiVo recordings to iPad (Air 2 and Mini 3 included), no matter where you are, you just need to take out your lover, and you will be able to enjoy your favorite TV shows or sports matches freely. However, you will be definitely bothered by the question of format incompatibility. To work this out, the only route is to convert Tivo to iTunes/iPad acceptable format, i.e. M4V, MOV or MP4, with the help of a Tivo to iPad Converter for Mac.

Preparation for syncing TiVo to iPad on Mac:

1. Software: Tivo to iPad Converter for Mac, TiVoDecode Manager;
2. Operating system: Mac OS X El Capitan/Yosemite/Mavericks/Mountain Lion

Guide:

Part 1: Transfer TiVo recordings to Mac (or MacBook)

Once you've recorded your favorite shows on your TiVo box, you can transfer them to your Mac with certain software as long as your TiVo box is connected to your home network. Although the TiVo Desktop software for the Mac (supplied by TiVo) does not allow user to transfer TiVo recordings to Mac, there are other freeware can accomplish this task, like the TiVoDecode Manager. 

* Run the app, enter your TiVo's IP address in the TiVo IP Address box. 
* Next click the Prefs button in the lower-right corner. Fill in the Media Access Key. A list of shows on your TiVo will appear in the Now Playing list. 
* Select the show and click Add Show To Queue. The selected show now appears in the Download Queue list. 
* Click Download Location to select where you want to save it. The app allows you to convert TiVo shows to MPEG-4 video for iPad. Of course you can play these TiVo shows with QuickTime Player. 

Part 2: Convert TiVo recordings to to iPad compatible formats

There are too many converting tools on market, yet few do convert TiVo files. A recommended one is iFastime Video Converter Ultimate for Mac (Review), which converts TiVo files to iPad supported format efficiently with high output quality in a hassle free manner. And it can also convert Tivo, MP4, H.265, MKV, AVI, VOB, DVD, Blu-ray movies, ISO/IFO image files, etc. to specific devices, since it offers optimized presets for differences gadgets, like Android, iPhone, iPad, VR One, Gear VR, Xbox, PSP, Roku, Sony Blu-ray Player, MP3 Player and more on Windows (Windows 10, 8.1, 8 included). Apart from that, you can change the video visual effects with the built-in video editor. The supported video editing functions include trimming, cropping, adding watermarks and also loading subtitles.

Before converting TiVo files, let's take a look at the iPad-supported video formats:

  1. H.264 video up to 720p, 30 frames per second, Main Profile level 3.1 with AAC-LC audio up to 160 Kbps, 48kHz, stereo audio in .m4v, .mp4, and .mov file formats;
  2. MPEG-4 video, up to 2.5 Mbps, 640 by 480 pixels, 30 frames per second, Simple Profile with AAC-LC audio up to 160 Kbps, 48kHz, stereo audio in .m4v, .mp4, and .mov file formats;
  3. Motion JPEG (M-JPEG) up to 35 Mbps, 1280 by 720 pixels, 30 frames per second, audio in ulaw, MacM stereo audio in .avi file format.

Now please refer to the converting procedures below:

Free Download iFastime Video Converter Ultimate for Mac:


Other Download:

Step 1. Input Media Access Key. 

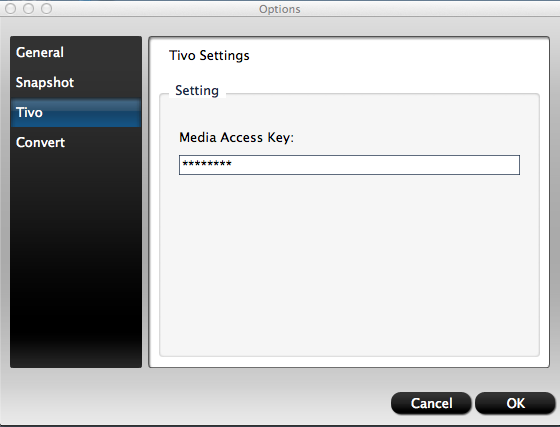
Launch iFastime Video Converter Ultimate for Mac, Click on the "Option" button, switch to TiVo tab, and enter your Media Access Key. Click "OK" to confirm.


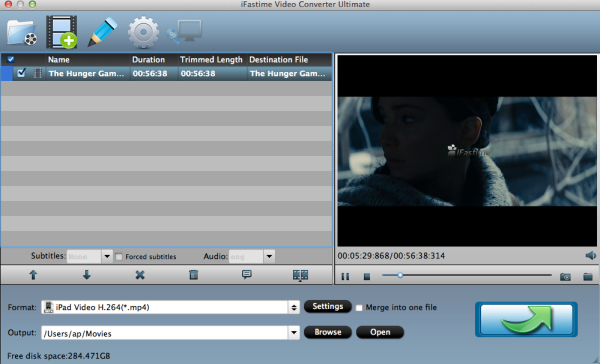
Then click "Add video" to import your Tivo files.


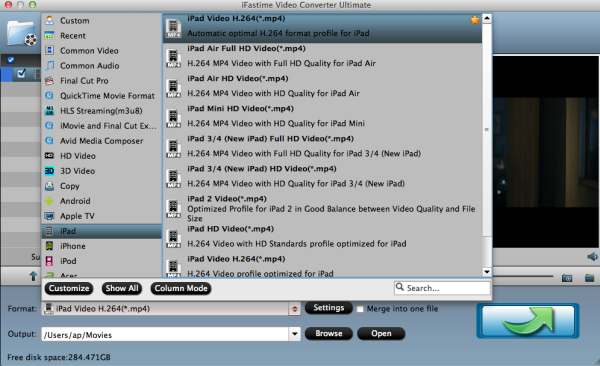
Step 2: Select an output format for iPad.

Click on the pull down menu of "Format" and then tap "iPad", after that, you will see three options optimized for iPad showing as below, including "iPad Video H.264(*.mp4)", "iPad Air Full HD Video(*.mp4)", "iPad Air HD Video(*.mp4)", "iPad Mini HD Video(*.mp4)", "iPad 3/4 (New iPad) Full HD Video(*.mp4)", "iPad 3/4 (New iPad) HD Video(*.mp4)", "iPad 2 Video(*.mp4)", "iPad HD Video(*.mp4)". You can select any one of them according to your own needs.


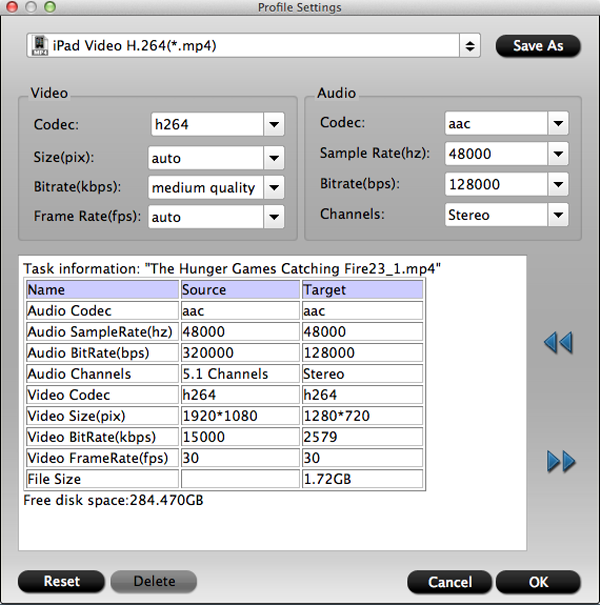
Step 3: Click "Settings" button to adjust audio and video parameters

You are allowed to adjust codec, aspect ratio, bit rate, frame rate, sample rate and audio channel in the popup window to optimize the output file quality. Following are the recommended settings to get best playback quality.


Step 4: Click "Start conversion" button to start conversion.

Once finished, you can get the output files for your iPad via clicking on "Open" button effortlessly. Afterwards, connect your iPad to your Mac, and then sync the videos to iPad via iTunes.

Provided that you prefer using PC to Mac, iFastime Video Converter Ultimate for Mac is a better choice for you to sync TiVo recordings to iPad for freely watching. The windows version is here and you can also use it to encode Tivo to Blu-ray Player for playback.

Have more questions about how to sync TiVo to iPad (Air 2/Mini 3 included) via Mac, please feel free to contact us>>

More Topics: