Today, with the development of the science and technology, the age of 3D has come. Once the preserve of Hollywood studios and Japanese TV makers, 3D is now heading for your home at a price you can afford, so a lot of people like to watch 3D movies at home for meeting with more requirements. Of course, you can play 3D movies on 3D meida player or 3D device like Samsung Gear VR, ZEISS VR One at home. However, most of the movie file is still 2D format, so you will worry about how to change 2D videos to more popular 3D(especially 3D AVI) videos on various 3D media players. Take it easy, next we will provide the solution, keep reading.
Maybe you have searched different answers from google for this problem, but no better method. Speaking here, I have to introduce you to a very simple way, that is to convert 2D video to 3D AVI video with a professioinal converter. iFastime Video Converter Ultimate must be a great helper with its powerful 2D to 3D conversion function offering super fast conversion speed. With it, you can also convert 2D/3D resources to 3D movies in 3D AVI, 3D MP4, 3D MOV, 3D WMV and 3D MKV format to watch on 3D devices with Side by Side, Red/Blue and Top/Bottom 3D effects. In addition, you can convert various format video such as DVD, Blu-ray, 4K and HD video to play on Galaxy Note 5, Nexus, iPhone 6S, iPad Air/iPad Mini, iPod, Zune, Archos, iRiver, PS4, Xbox 360, Xbox One and others. (Tips: You can read review to learn more iFastime Video Converter Ultimate features)
Now free download the best 2D to 3D AVI Converter. It is quite easy for you to launch and run this program just follow the software installation suggestion.

 Other Download:
How to Convert 2D video to 3D AVI with iFastime Video Converter Ultimate?
Step 1. Load your 2D video files.
Launch the best 2D to 3D Video Converter. Click the button "Add video" to add 2D MP4 video files to it. If necessary, you can double click the each file to have a preview.
Other Download:
How to Convert 2D video to 3D AVI with iFastime Video Converter Ultimate?
Step 1. Load your 2D video files.
Launch the best 2D to 3D Video Converter. Click the button "Add video" to add 2D MP4 video files to it. If necessary, you can double click the each file to have a preview.
 Step 2. Select 3D AVI output format
Click "Format" and select "AVI Side-by-Side 3D Video (*.avi)" from "3D Video" category as the output format. Then set the output folder by clicking "Browse" icon as you need.
Step 2. Select 3D AVI output format
Click "Format" and select "AVI Side-by-Side 3D Video (*.avi)" from "3D Video" category as the output format. Then set the output folder by clicking "Browse" icon as you need.
 Tip: Click Settings to adjust the parameters like video codec, video bitrate, video frame rate, audio sample rate, audio channel. 1920x1080 compressed side-by-side 3D should be resampled to 1920x540 resolution full side-by-side resolution.
 Step 3. Save 2D video to 3D AVI video.
Click the the gerrn arrow button at the bottom right corner; it will make 3D AVI video from 2D MP4 on Mac immediately. After the short 2D to 3D movie conversion, you can get the output file effortlessly.
Just have a try to enjoy created 3D videos on your 3D TV or some other 3D supported multimedia devices at home with your family, that must be a totally different experience, it will impress you!
Have more questions about how to create 3D AVI from 2D videos, please feel free to contact us>>
More Topics:
Step 3. Save 2D video to 3D AVI video.
Click the the gerrn arrow button at the bottom right corner; it will make 3D AVI video from 2D MP4 on Mac immediately. After the short 2D to 3D movie conversion, you can get the output file effortlessly.
Just have a try to enjoy created 3D videos on your 3D TV or some other 3D supported multimedia devices at home with your family, that must be a totally different experience, it will impress you!
Have more questions about how to create 3D AVI from 2D videos, please feel free to contact us>>
More Topics:
Final Cut Pro is a professional editing software developed by Macromedia Inc and Apple Inc. It is a wonderful tool to help you put your videos such as AVI videos into professional eye-catching movies.
However, not all AVI files can be accepted by FCP X/7.

That is to say, if your AVI video files are not imported, that's maybe because the AVI file codec is not recognized by Final Cut Pro. Therefore, sometimes you may find it a painful experience to import AVI files into Final Cut Pro X/7 for further editing, and you may encounter some problems as below:
“I'm trying to import a number of small .avi files into FCP X but each time I try I get the message "No importable files - None of the selected files or folders can be imported. Change the selection and try again.”
“Though I successfully import Blackmagic Cinema Camera recorded AVI footage to Final Cut Pro 7, it only gets audio in its full length, but video is all blank.”
Faced with those situations, you’d better change AVI to FCP X/7 more friendly format like MOV. Don't worry! For most AVI video files, you only need a powerful tool like iFastime Video Converter Ultimate for Mac to make AVI(DivX, Xvid, H.264 etc. codecs) file compatible with Final Cut Pro X/7, which is fully compatible with all major Mac OS X operating systems like Mac OS X 10.11 El Capitan, Mac OS X 10.10 Yosemite, 10.9 Mavericks, 10.8 Mountain Lion, 10.7 Lion, 10.6 Snow Leopard, 10.5 Leopard. The professional converter also helps to convert H.265/XAVC/MTS/MXF/AVI/MP4/FLV/WMV/MPG etc.
Hot search: H.265 to FCP | Canon EOS M10 MP4 to FCP | Sony A7SII AVCHD in FCP | WMV into FCP | DVD to FCP
Firstly download this top-ranked AVI to FCP converter and run it on your Mac:

 Other Download:
Simple three steps to Encode AVI to Final Cut Pro X for editing
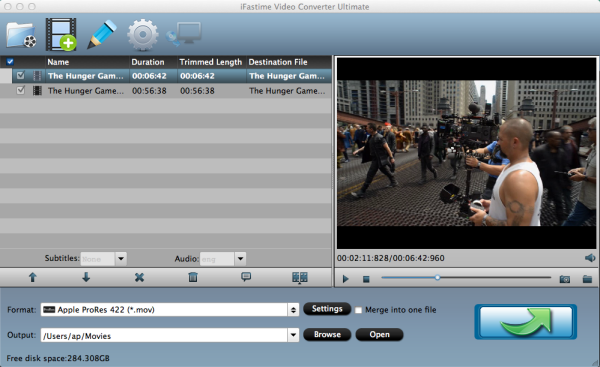
Step 1. Import AVI files to the program
Simply drag-and-drop your files or use the files tab in the converter's interface to browse for your .avi files in your computer.
Other Download:
Simple three steps to Encode AVI to Final Cut Pro X for editing
Step 1. Import AVI files to the program
Simply drag-and-drop your files or use the files tab in the converter's interface to browse for your .avi files in your computer.
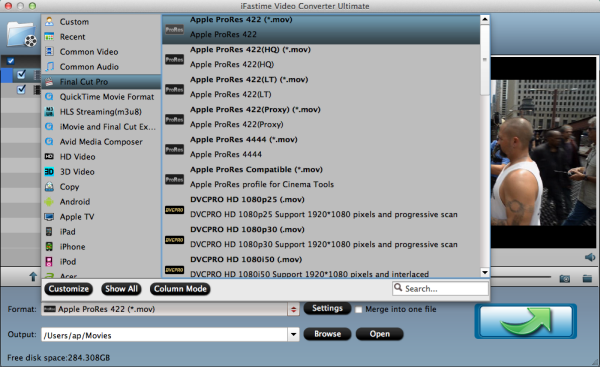
 Step 2. Choose FCP X compatible format
Go to "Format" bar and choose "Final Cut Pro > Apple ProRes 422 (*.mov)" as output format for Final Cut Pro X.
Step 2. Choose FCP X compatible format
Go to "Format" bar and choose "Final Cut Pro > Apple ProRes 422 (*.mov)" as output format for Final Cut Pro X.
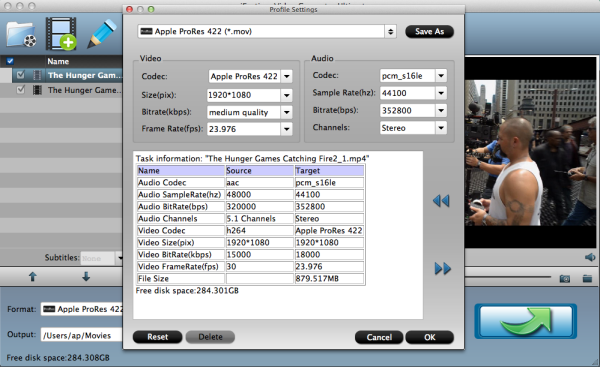
 Tips: Adjust video and audio settings
Click the "Settings" button and customize proper video/audio parameters including Video size, bitrate and fame rate and more.
Tips: Adjust video and audio settings
Click the "Settings" button and customize proper video/audio parameters including Video size, bitrate and fame rate and more.
 Step 3. Start converting AVI to Final Cut Pro
You should be ready to start conversion at this point. Just click on the green arrow button that can be found on the menu. Wait for a while and the video converter will do the trick. You will soon have your AVI video into a format that's recognizable and editable by Final Cut Pro X– the MOV format.
When the conversion is done, you need to import converted videos to FCP X/7. And how to import videos into FCP X/7?
How to Import videos files into Final Cut Pro X/7?
Here are the main three steps:
Step 1. Run FCP X/7
Run FCP X/7 on Mac and connect your camera to Mac with a USB cable and turn it on.
Step 2. Import video files from camera to FCP X/7
Click File on main UI to follow “Import” and “Media”. FCP X/7 allows you to import iMovie project, iMovie Event Library and camera.
Step 3. Create new event or add to the existing event
After checking the video files you want to import in your camera, click return to choose to create new event for this importing or just add the video files to the existing event.
Step 4. Edit video files in FCP X/7 timeline
After clicking the “Import” button in the third step mentioned above, you’ll find the imported video files under “All Clips” item, and right click to follow “Open in Timeline” and you can edit them freely.
Now you can edit your AVI videos in Final Cut Pro X/7/6 at ease.
Have more questions about how to change MKV to FCP X for editing, please feel free to contact us>>
More Topics:
Step 3. Start converting AVI to Final Cut Pro
You should be ready to start conversion at this point. Just click on the green arrow button that can be found on the menu. Wait for a while and the video converter will do the trick. You will soon have your AVI video into a format that's recognizable and editable by Final Cut Pro X– the MOV format.
When the conversion is done, you need to import converted videos to FCP X/7. And how to import videos into FCP X/7?
How to Import videos files into Final Cut Pro X/7?
Here are the main three steps:
Step 1. Run FCP X/7
Run FCP X/7 on Mac and connect your camera to Mac with a USB cable and turn it on.
Step 2. Import video files from camera to FCP X/7
Click File on main UI to follow “Import” and “Media”. FCP X/7 allows you to import iMovie project, iMovie Event Library and camera.
Step 3. Create new event or add to the existing event
After checking the video files you want to import in your camera, click return to choose to create new event for this importing or just add the video files to the existing event.
Step 4. Edit video files in FCP X/7 timeline
After clicking the “Import” button in the third step mentioned above, you’ll find the imported video files under “All Clips” item, and right click to follow “Open in Timeline” and you can edit them freely.
Now you can edit your AVI videos in Final Cut Pro X/7/6 at ease.
Have more questions about how to change MKV to FCP X for editing, please feel free to contact us>>
More Topics: